Try finding a saw sharpening service today. It is a daunting task. I have never been inside such a shop. When I was growing up, my mom sharpened the butcher knife (the one and only knife used for everything in our household) with a small sanding block. She would do it after everyone – even the baby – put in their two cents and observed out loud that the kitchen knife was dull. It was an event!
Once in a while, a man would drive through the neighborhood offering on-the-spot sharpening. His visits generated a lot of excitement. That man was the most popular person in town that day! I don’t know if he sharpened many edge tools or saws. Most of the neighbors I knew didn’t have them.
Note: this post is about making a saw sharpening vise, not saw sharpening.
A familiar saw lament
I am sure many woodworkers can relate to the following scenario: one saw does everything. That includes crosscutting, rip sawing, jointing, rough cutting, “chainsawing” and just about anything else. That lone saw is used for most any task in the shop. It. is. never. sharpened.
It becomes more dangerous.
The saw is literally worn to the nubs until it is, still reluctantly, thrown away and replaced with another used saw.
Learning to sharpen edge tools like chisels and plane blades is work enough. Hobbyist woodworker or professional, neglecting a task like sharpening tools can, in any number of scenarios, be fatal!
Once you recognize that your handsaws need to be tuned and sharpened, what are you going to do? If the service is available, you can send your precious saw away, pay in advance, and wait several weeks to get it back.
A handful of modern manufacturers offer saw sharpening services as an enticement to buy their tools.
Learn to sharpen your own saw
You can take on this skill and learn that:
- simple geometry governs saw sharpening,
- one saw does not fit all tasks in the wood shop,
- saws are more than a handle and teeth.
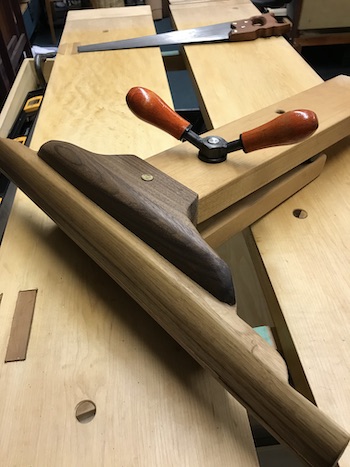
A handy aid for sharpening your saw is a sturdy vise. Old vintage 9-1/2″ saw vises can be found at antique tool markets. Vises by early saw makers are sought after today. The heavy, cast iron vises clamp to the wood bench.
Modern saw vises are still made today. One tool maker’s heavy steel vise is engineered to be an improvement over the older vises. Another change is that it can be mounted instead of clamped to a sturdy bench or table.
Note: most modern saws with specially hardened metal blades may nor be good candidates for sharpening. Once the teeth are worn down, sharpening cannot be done in the traditional sense. Rock, paper, scissors —- hardened steel files won’t sharpen hardened steel blades. Old, vintage saw blades typically are not hardened so they respond well to the saw files.
An old saw could be made to sing when it has been recovered, refurbished or restored. Yes! We can have nice things in the shop.
A saw sharpening vise is useful
Bench vises, including end vises, can be sufficient to use for saw sharpening. I used a 6″ end vise on my wood bench to sharpen a 28″ blade after I made my frame saw. It was a work around that helped me complete the project. I did not, however, want to do that for my dovetail and other saws with handles that I could not manipulate into that small vise.
During sharpening with shorter width vises, the saw line has to be moved 2 or 3 times. This takes advantage of the stability provided while working within the width of the short vise jaws. It is necessary so that the sharpening action is uniform across the saw. But it can be an inconvenience.
A wooden saw vise may reveal itself in an old woodshop or barn. Most likely, it was made in the shop by the user. My plan today is to do just that.
The Shop Poem
If you are going to make the project, be mindful and be safe.
Make a saw sharpening vise
I bought a hardware kit for the saw vise from a tool accessories maker at Handworks. My goal was to save money and build a vise with longer jaws. I thought about how I wanted the vise to look and operate.
For my needs, I cut 4 blocks for the jaws: 22″ long x 5″ wide x 1-1/4″ thick. I wanted a longer jaw length that I would not have to adjust or move my saw so much.
The woods that I chose for the vise were walnut and maple. I picked the wood out of my scrap pile. That roubo bench build just keeps on giving.
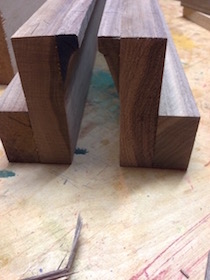
Instead of using a single block for the jaw, I used several smaller blocks that I sandwiched together while keeping the final result in mind.
Two walnut blocks were kept intact as the main (middle) jaw body. The remaining blocks were ripped in half for the front upper vise jaw extension and the lower back jaw extension.
These pieces were glued to the upper front and bottom back of each of the main jaw bodies to make a “Z” shaped sandwich.
Building Blocks
Upper jaw extension
One ripped walnut block was used for the upper part of the jaw. I kept in mind that the body of the saw had to fit in the vise below the working area. Therefore, I shaped the upper jaw extension before attaching it to the main jaw body. I did this by ripping diagonally down the length of each upper jaw. Then, I gouged and rasped each newly ripped side into a concave shape.
Lower jaw extension
The other ripped walnut block was glued to the lower back of each main jaw body.
About the shape and size of the vise: it is pretty much your choice. The hardware kit has instructions and useful advice. I made the vise according to my needs. You might decide that you want something else. There are many iterations of saw vises on the interweb that serve up inspiration.
After I glued the sandwich together, they created a channel for the saw. The only thing left was to do a little refining with rasps and sandpaper. I wanted to fit as many and as much of the saw teeth into the vise before moving over to any remaining teeth.
Shaping the Jaws
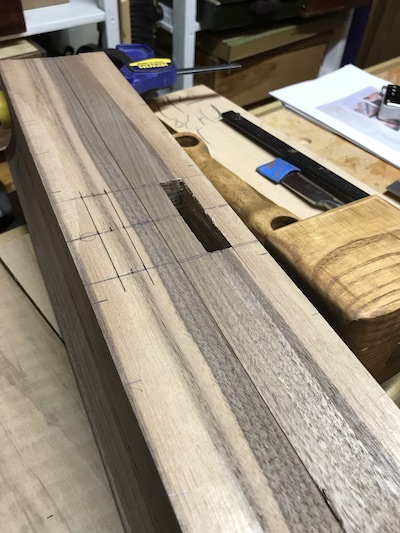
After each jaw is mortised, I shape them with a saw, rasps, and sandpaper. Shaping takes into account the reduced mass of the jaws. They still must be able to withstand the force of tightening around the saw. The extended length must remain rigid. Bending or flexing, in this case horizontally against the force of filing, is detrimental to a good sharpening job.
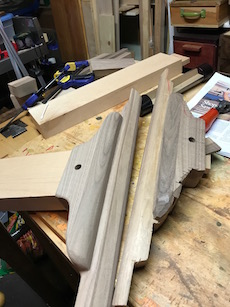
After a lot of shaping with the rasp and sanding the jaw, it is looking pretty good.
This is the end of part 1.
_______________
Next time: Saw Vice – part 2.
Shirley J 💚
