Years before I had a woodworking bench, I used a work table made of a hinged, folded sheet of 3/4″ plywood on two shop made sawhorses. This was the setup on one side of my garage. When I was ready to work, I opened out the sheet to its full 8′ by 4′ dimensions and placed it on the sawhorses.
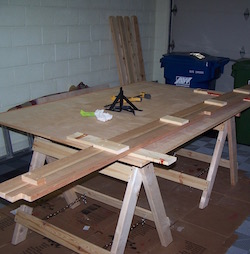
After a day of woodworking, I would fold up the plywood “bench” and the sawhorses until next time. This portable workbench served me well for a number of years. I used clamps to hold down the wood on the edges of the sheet but struggled when I needed something clamped or held down nearer the middle of the plywood table.
This arrangement was sufficient until it wasn’t. I always felt that a proper workbench would be nice but was unnecessary. I put up with frustration related to the rag-tag setup for a long time.
The clamp problem diverted energy while I figured out creative ways to hold the work.
Indeed, this started my search for a more efficient bench setup.
Initially, I looked to purchase a workbench that would fit in a corner of my garage. I was not impressed with the benches that were within my small budget. Better quality benches, however, were too expensive.
If I Can Say Roubo I Can Make a Roubo
Before long I heard and read about the roubo workbench and its place in history. In the 18th century, Andre-Jacob Roubo documented work shop practices and tools in a massive compilation called L’Art du Menuisier, The Book of Plates.
Roubo described, suggested, and admonished in words and drawings, or plates, about life in the ancient work shop. He detailed every tool that cabinetmakers or joiners would use in an efficient, disciplined, and complete shop.
A heavy, momentous, bench built for making mostly furniture and mouldings was featured on the, now, well-known Plate 11.
Aspiring journeymen were expected to use the tome as part of their training in the compagnonnage system in France. This system expected masterworks from those completing their studies in their desired skill area. The long, arduous path to master was not always direct or even completed.
For a young man or young woman, the compagnonnage is a traditional mentoring (apprenticeship) network through which to learn a trade while developing character by experiencing community life and traveling.
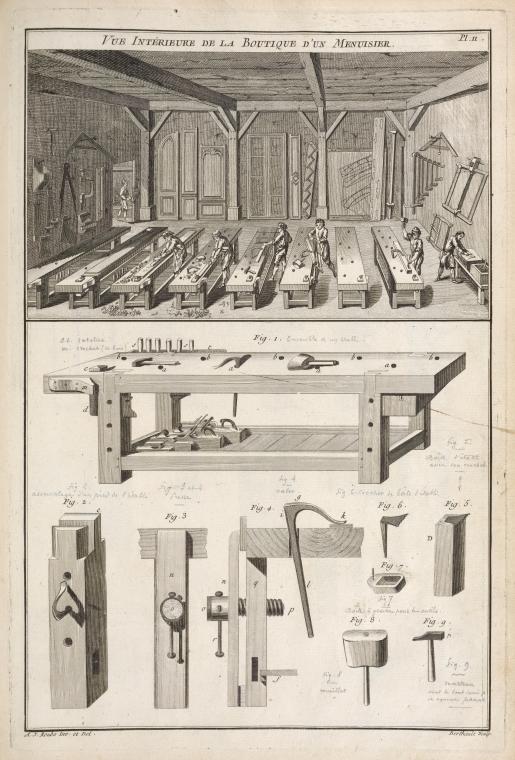
from Roubo’s L’Art du Menuisier, The Book of Plates
Source: the New York Public Library digitized collection
Thus, trade education and apprenticeship programs utilized the tenets from The Book of Plates in various ways. As tool technology made bigger strides, Roubo’s workshops became somewhat obsolete. The tenets of compagnonnage were broken up resulting in the woodworking arts devolving into a more individual pursuit.
Most modern day woodworkers, including myself, had no idea about Roubo and its influence on life in our own shops.
Enter. The bench.
Enthusiastic woodworking conversations theorized why anyone would take on such a project.
After all, it was only a solid, heavy bench. Wasn’t it?

Lately, a comprehensive English translation of L’Art du Menuisier was published by Lost Art Press featuring all of the plates with drawings of the tools, workrooms, and the Roubo bench.
The revived interest opened up the world to Roubo and was quickly embraced by a different kind of woodworker: the hobbyist. Woodworkers, new and seasoned, all over the world made this bench. Most were being made over 6 feet long, some even 8 feet long or more and meant never to be moved from where they stood.
Notably, these individuals performed this bench building feat without the pressure of an arduous apprenticeship hanging over their heads!
Many interpretations of the bench featuring massive dovetails as endcaps, sliding deadmen, and any number of additions, old and modern, soon appeared. Any detail that could be imagined was applied to the bench. Me? Well, I’d never done dovetails, mortises, or tenons. I was afraid to undertake such a big, intimidating project.
Some benches were decked out with tail vises, leg vises and workholding accessories in many configurations. A gap stop, to make clamping on the bench top easier, was another option used by many. In other words, the benches were being tricked out. Yes – a woodworking bench!
A popular excuse used to justify investing in a roubo bench was that it served as a kind of modern woodworker’s “final exam” project. It utilized knowledge in designing, laminating boards, jointing, installing hardware (some quite expensive), flattening, and finishing.
Thus, a project like this required stamina and resolve. For some woodworkers, this was the first and last time that they took up such a project of this magnitude in their shop.
Of course, completed roubo benches appeared on the market ready to be shipped anywhere. They were pricey.

Eventually I saw a “live” example of the bench up close in a furniture making workshop run by Jeff Miller. Then, I saw a fully outfitted bench at Handworks in Amana, Iowa. After a lot of research and overthinking about it, I designed my bench according to my specs. Although some of the joinery was intimidating, I committed to do this. And I discovered alternative workholding devises.
More months passed before I picked up a saw and went to work. I knew I could make a roubo bench myself by learning along the way.
Can I do this? Of course I can!
The benches in Plate 11 appeared to be made from single, thick wood slabs. Ironically, it is quite difficult to find those pieces, today. And when you do, they can be quite expensive.
Choice of wood species plays a role, but that is subject to accessibility and proximity. Modern day innovations include lamination of thinner boards to get the thickness and width of those ancient slabs.
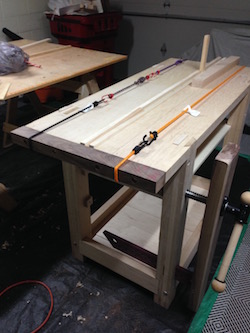
My “plan” was strictly based on the lumber on hand. I already had the wood for this in my garage for over two years!
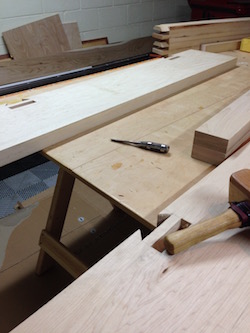
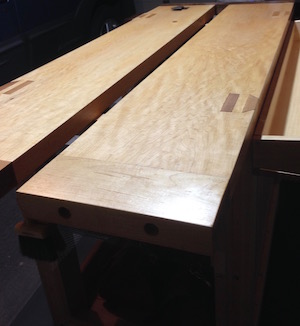
I had a pile of dimensioned maple planks including two 11″ x 55″ slabs that were perfect for the bench top. When I first heard of the Roubo bench, I bought the slabs and put them away for a couple of years. It was sheer luck that I still had the wood. I was tempted to use the wood for other projects…many times.
Additionally, I found a pile of dimensioned 4″ x 3/4″ planks that I laminated four at a time for the legs.
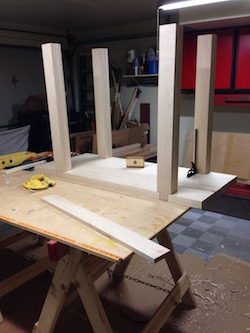
Without a lot of tools, clamps, or knowledge as to how this bench was really put together, I knew I had to start the project in order to figure it out. Also, lengthwise, this would be a short bench. Importantly, I wanted to make sure that the bench would be safe and not a tipping danger.
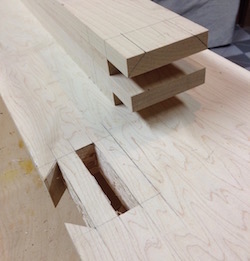
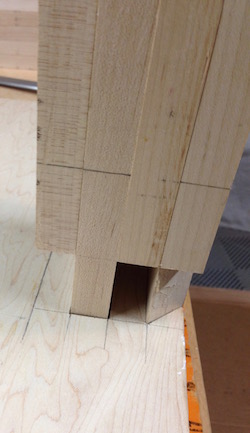
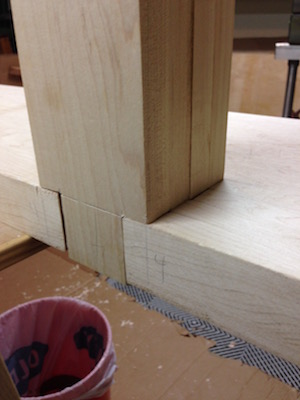
Here are some of the notable construction details:
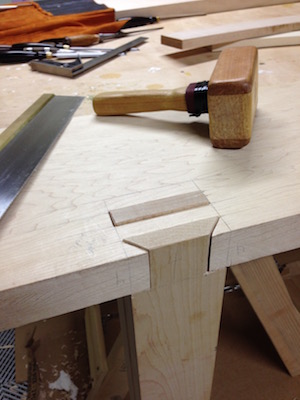
• The tenoned legs were joined, with double mortises, to the bench top.
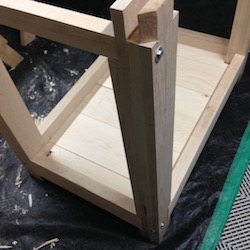
• The legs and stretchers were attached with lag bolts and lap joints.
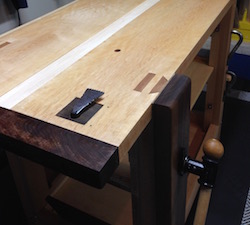
• A walnut end cap that spanned both slab tops and bench gap was joined by glue and lag bolts.
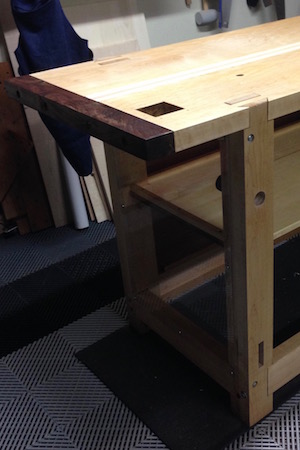
• On the opposite bench end, a maple cap was joined to only one slab. The end vise was attached to the other slab on the same end of the bench.
I was fearful of messing up this project and losing a lot of expensive wood. On the other hand, I was excited and curious to see how each piece of this puzzle would fit together.
Let’s find out in the next post.
This is part 1 of 3 of the Roubo bench build series.
Next time: My Roubo – Part 2.
-Shirley J
❤️
