The finishing touches are all that remain in this final installment of building the Spanish style chest. I really like the progress made in part 3. Now, I am “bringing it home”. Ironically, it was a build that had been long on the mind but short in the actual making. I do like how it’s turning out even though it is a seat of the pants design. In other words, I’m making this up as I go.
Work remaining
- Attach lid handle,
- Paint decorative angle irons and leg base black,
- Make inside box with lid, side box supports, and apply cherry toned finish,
- Attach all hardware: angle irons and hasp, and chain lid support,
- Apply clear topcoat on the lid,
- Paint the chest with milk paint; finish with clear topcoat,
- Set chest on leg base.
Making this up as I go?
I observed at the beginning of the build:
Details in design, structure, and purpose are the elements that make the vision come alive. What you desire to be prominent on the project should be given more than a little consideration. This becomes important as thought manifests into reality.
I said this, too:
Ultimately, you will confront, to your chagrin or delight, choices made hours or even days ago. As much as we would like it to be, not much in the shop is really random.
Random but not so random – remember?
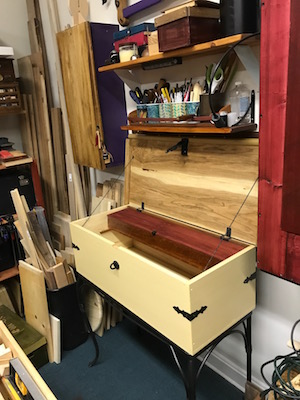
Attaching the lid handle to the chest
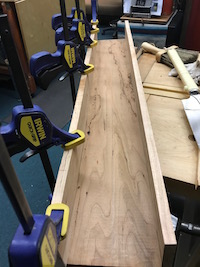
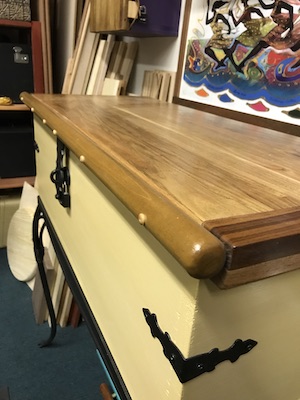
I had a 48″ long, 1-1/4″ diameter hardwood dowel saved from a canvas closet system disposed of long ago. The wood dowel was just too good to throw away. Cut to match the length of the front, it would make a fantastic finishing touch for the chest. I knew I kept it all these years for a reason!
I used glue and 2-1/2″ screws to attach the dowel bar to the front edge of the lid. All of the dowel screw holes were filled with pine wood plugs.
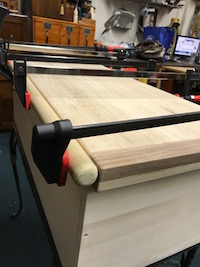
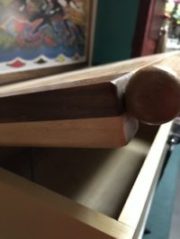
The sawn dowel ends were rounded with a chisel and sandpaper for a softened effect.
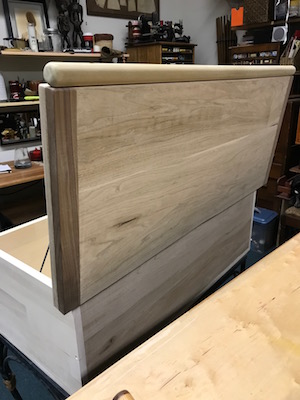
If you noticed, the top of the dowel is flush with the lid, creating an uninterrupted top surface. At the front edge, the dowel covers the 3/4″ lid thickness. This leaves 1/2″, enough to create a shallow but effective dust seal the length of the chest.
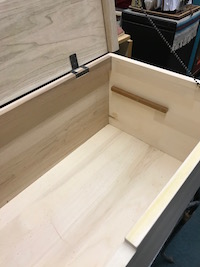
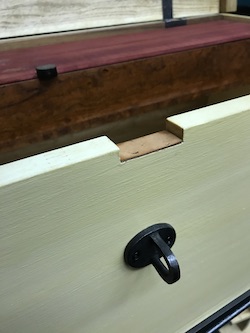
Another finishing touch – the inside box
I had scrap pieces of dimensioned 1/2″ cherry boards from a leftover project. These would make a handy inside storage box that would run the length of the chest. I used 2 pieces of 3″ x 1/4″ mystery cutoffs for the lid.
Another idea: how about some support for the box so it can be removable?
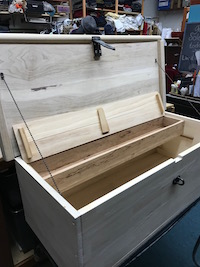
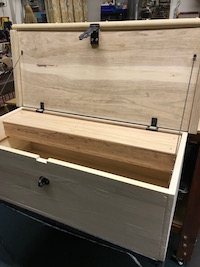
Eventually, the inside storage box is finished with a cherry-toned water soluble dye stain. Lastly, an ebony “thumbnail” is embedded in the front edge of the lid for opening and closing the box.
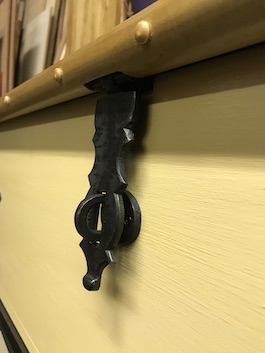
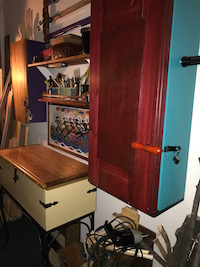
Hardware: hasp and angle irons
The top of the hasp or buckle is embedded in the bottom of the thick dowel, underneath the lid.
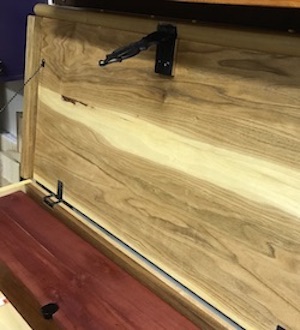
Now, only the decorative portion of the hasp shows when the lid is closed.
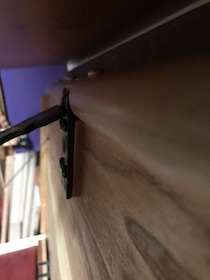
This allowed the handle to remain intact and keep its uninterrupted line along the chest front.
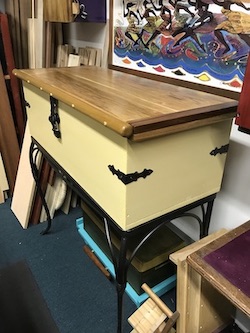
A special finishing treatment for the hasp
A piece the thickness of the hasp buckle was cut out of the top front edge. This enabled the heavy hasp to seat out of the way of the lid. I lined the bottom of the cut-out with leather to reduce the noisy clang when the lid is shut.
Lid chain
Lid chain supports were added for two-handed rummaging around in the chest. As one of those initial considerations discussed earlier, the chain would not be necessary if I used a lid stay, or torsion hinge, or any other self-supporting type hinge.
I like the slow drawing sound of the box chain as the lid is raised and lowered. Rubbed bronze spray paint reduces the brightness of the brass chain and dampens the clinking sound. The visual effect of the chain draping in and out of the chest is a reminder of something that, right now, is difficult to explain. The act of laying the lid back feels like I am opening my own “secret” treasure chest.
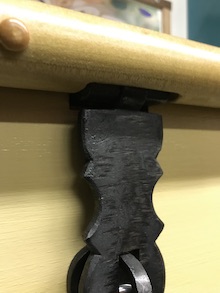
Angle irons
To give the chest a Spanish finishing signature, I spray painted four decorative angle irons black for the sides.
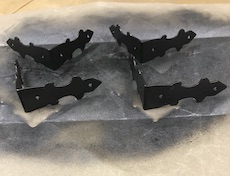
The angle irons fit over the edges of the chest, midway up each side, front and back.

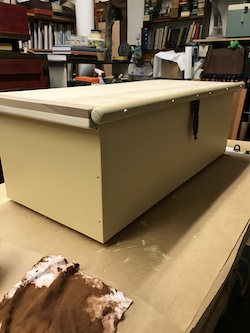
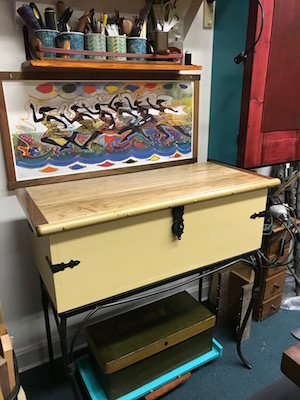
Painting and finishing the chest
A couple coats of water-based milk paint* finish were applied to the chest before the hardware was attached.
* this is the premixed acrylic edition, not the powdered casein-based product.
I will tell you how I use it. Many times I crumple brown kraft paper and use it to lightly “sand” the dry paint surface. It levels the roughened surface without danger of taking the paint off. A swipe with the shop brush or cloth and the surface feels buttery smooth.
Maybe it’ll rub off
There is temptation to leave the buffed surface alone. It looks and feels that good! But I don’t leave it. My experience after years of using the milk paint finish is that the flat, matt surface is subject to what I call burns or extreme scuffing. It resembles a bald spot on a short-haired dog.
Paint may rub off of an unprotected finish after time has passed. You may even find that a double paint transfer occurred. An opposing surface has left something on yours!
The surface can be left as it is. Alternately, an easy repair can be made by buffing out with brown kraft paper or touching up with the paint. It depends on how rustic you want your project to be.
I addressed this likely occurrence by finishing the project with a water-based clear satin topcoat. This finish is applied to the lid, the lid dowel handle, and the body of the chest.
One last thing regarding the topcoat: I use the crumpled brown kraft paper on it, too. I do this for satin and, sometimes, semi-gloss finishes. The result -my reward – is a buttery smooth surface that softly glows.
A new box in the house shop
The chest is in the corner of the wood shop and looking good.
Well, that is all I have. I don’t know any artist who is ever really ready to call a project complete, even on the verge of final finishing.
It is always important to know when something has reached its end. Closing circles, shutting doors, finishing chapters, it doesn’t matter what we call it; what matters is to leave in the past those moments in life that are over. – Paulo Coelho, The Zahir
¡Es acabado! Ok, it’s finished.
_________
This concludes part 4 of 4 of the Spanish style chest build series. Here are the others:
– Prologue: essay,
– The Building Begins: part 2, and
🌕S

2 thoughts on “● Finishing The Chest: part 4”
Very good, I have been waiting on the finished product and it is as beautiful as I vision it to be, well done waiting on the next project.
I could not stand the suspense myself!
Comments are closed.