Before the blog, there were projects that I completed because I had to. They were done by hook or crook, without “good tools” or simply, by my bootstraps.
Things at home as well as the shop break down. Many require repairs or some kind of maintenance. Some of the projects were in response to a special need or emergency, so the stories were not recorded in any detailed way. Of course, the microwave niche was a result of my whim or nudge by my friend, “mischievous me“.
My recollections, here, are meant only to entertain. They may provide an idea, a solution, a lot of oh-oh’s, a few oh no’s, or a nod of agreement.
I am always doing what I cannot do yet, in order to learn how to do it.
– Vincent Van Gogh
I still smile to myself when recounting how I did these things and – you know what I am about to say – lived to tell the tale!
I’ll start where I left off before the camino, before the wood shop, before… what? You get the point. I am remembering and ever so lightly critiquing some of my first projects. Won’t you join me?
_______
Story #1: Microwave Niche
Kitchen counter space is always a problem. What is the problem? It is this: there never seems to be enough space for things that have a permanent home there. The coffee pot, toaster, utensil caddy, and things you just cannot find room for in the cabinets end up on the counter.
Soon, more small appliances that you just happen to “need” come home with you. Either there is no room elsewhere or you want to look at them admiringly when you are in the kitchen. They are so pretty and new and now they have a home on that limited space! And they match and coordinate so well with the mixer, toaster, and tea kettle – also on the counter.
They all are somehow arranged to fit in the space and a little is left over for food preparation. There may be a spot left for the milk or juice carton when you want to fill a cup. Oops, that cup needs a little room.
Where is the elephant?
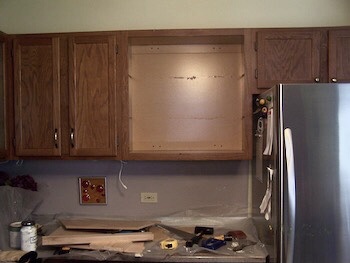
Now, I had an elephant in the kitchen that was getting on my nerves. I could not hide it. As much as I tried to clear the counter of all the unnecessary residents, the microwave oven couldn’t go anywhere. I don’t use it often, but it takes up the most space.
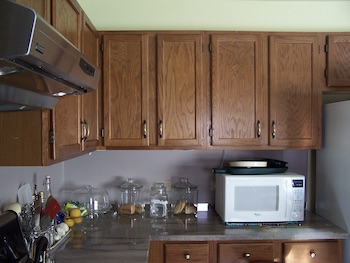
What can I do? I could put it on the other side of the kitchen. But that was too far from the refrigerator. It was not going to work.
I sat in my kitchen many days trying to figure out what might work. This appliance had to be close to an electrical outlet… safely placed, mind you. I just did not have the room.
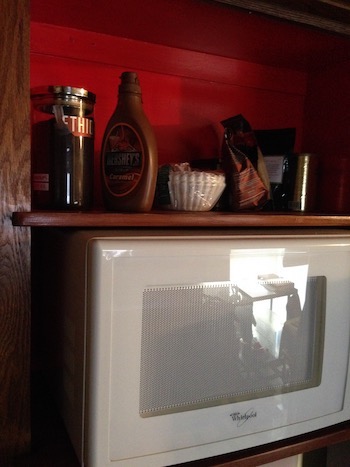
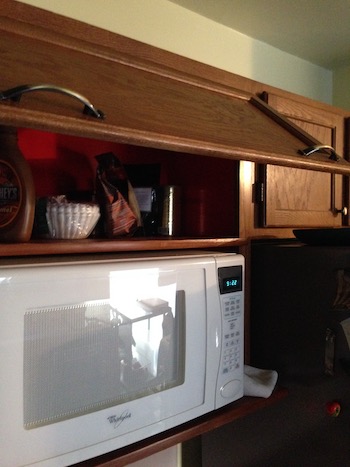
I had some cabinet space above the microwave that was not used as much as my spice cabinet.
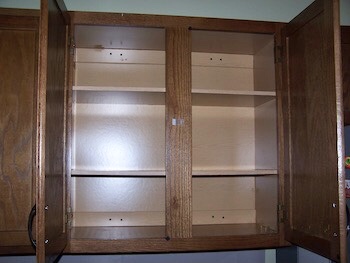
Could I see a microwave in there?
Let’s see.
Point of no return
I took the doors off. That was not a commitment. I’m halfway there.
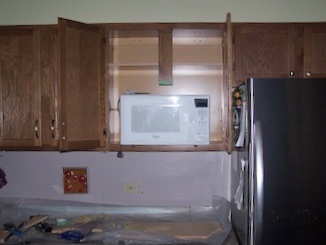
Now, cutting the center stile and removing the shelves meant I was all in! You can see that initially I only cut part of the stile, just enough to ease the microwave into the cabinet. After a lot of thinking, I cut the whole thing off because it was taking too much brain power to preserve the rest of the cabinet. And the doors would have required modification.
Fortunately, there was no danger that the cabinet would collapse.
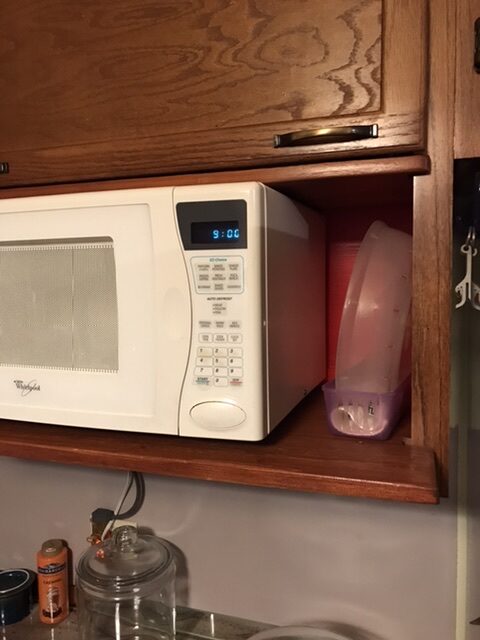
I filled, sanded, and applied a couple coats of primer on the inside cabinet walls. A new bottom shelf for the microwave was dry fitted at this point. The depth of the microwave was greater than the cabinet. It overhangs the original bottom shelf by a few inches. The new shelf’s measurements account for this discrepancy.
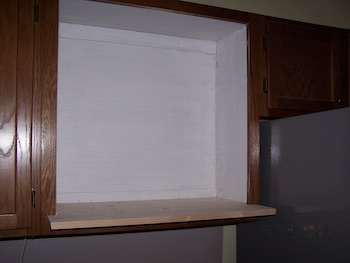
I discarded the original (laminated MDF) inside shelves. The original bottom shelf was not removed. Two new shelves, from wood, were shaped to fit the space. One was fitted inside the cabinet a few inches above the microwave oven. The oversized shelf was fitted on top of the original bottom one.

A little color
I love color. Dramatic pops are energizing to me. I completed another project before this one that featured this color.
Bringing it into the kitchen in the microwave niche brought a bit of cohesion to my decorating scheme. A little color would furtively peek out around the microwave. More would be revealed whenever the storage door was opened.
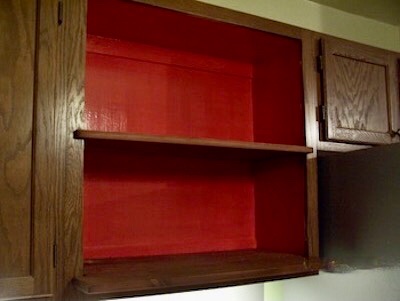
I rounded the edges of the shelves gently for appearance but also to protect my arms and hands any time I reached into the storage space.
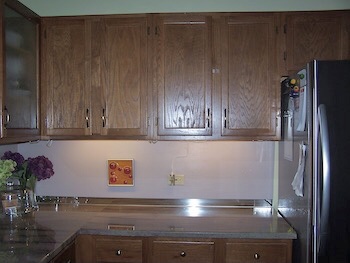
View from the sink:

One of the old cabinet doors was used for the storage area above the microwave niche. I reoriented it from vertical to horizontal. Also, the original hinges and handles were reused.
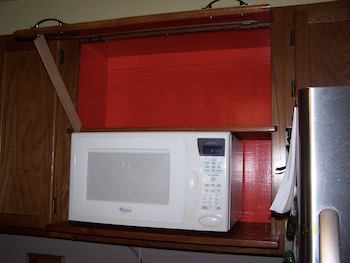
A little care was taken to make sure that the door fit with even gaps at the top and above the microwave.
The door operates smoothly!
The new niche looks like it was always there.
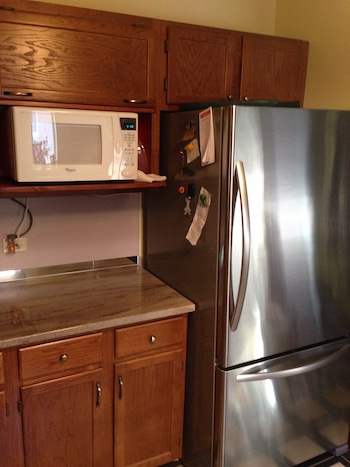
Microwave niche
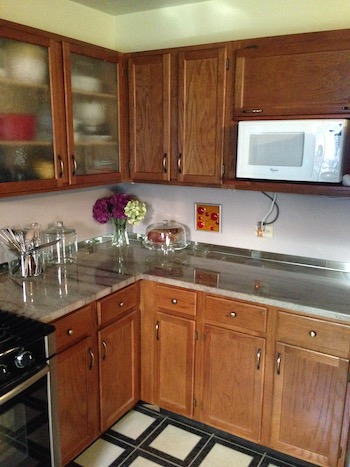
All done. The counter looks neat and spacious.
What do you think? Was it worth the small amount of time, effort, and cost to do this?
_____
Baadaye
Shirley J ♥️
Remember: If you are going to make any project, be mindful and be safe.

2 thoughts on “● Microwave Niche”
Looks like it was original and I cant believe that door fits like a glove.
Thanks for reading! I was relieved that I could reuse the door for the storage space. And having it fit provided a lot of momentum to finish the project the way that I did. ♥️
Comments are closed.