Dan Mask Marquetry-Part 3
I tried to take a respectful approach to the Dan mask as a subject. Marquetry is an engrossing art. There are many approaches depending on where in the world you want to start. Whether it is the Italian, French, English or your own way it ends up being a beautiful conclusion to a humbling experience.
Designing, cutting, preparation of surfaces, and final finishing – all of these things test the artist. It is a challenge that yields a great reward for persevering and keeping your head. Once the challenge is accepted, as it is in most things in life, the next step and every step after becomes clear.
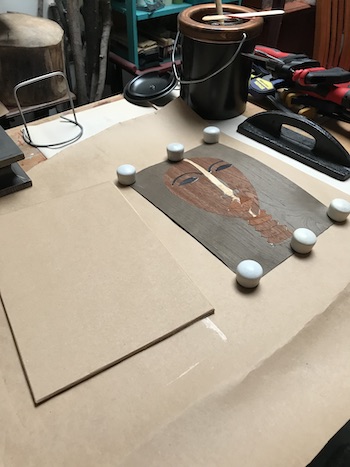
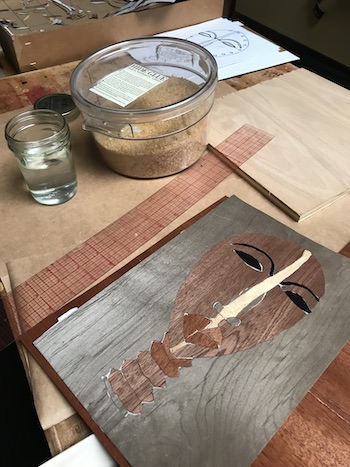
At the end of part 2, the veneer tape covered mask was ready for another pressing. First, all of the blue tape must be removed from the back.
Glue tales
Earlier, I mixed up a batch of liquid hide glue to reassemble the mask.
Out of the press, both the 3/16″ substrate and the (now untaped) back of the reassembled marquetry puzzle are lightly lathered with heated liquified hide glue. I spread the glue on the back with the brush which also filled every pore and seam of the reassembled mask. Remember, the back is facing up and the veneer taped show face (front) is down.
The puzzle is flipped over onto the substrate. A rubber roller is used to add pressure and assist gluing. At this point, the front face is up.
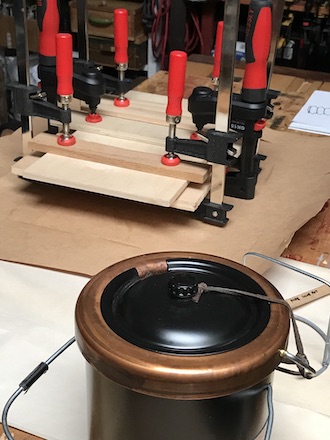
Next, I attached a sheet of 1/16″ veneer on the back of the substrate to balance the tension from the glue assembly on the front.
Now, the new assembly is covered with wax paper, and enveloped between two plywood boards. The whole assembly is once more tightly clamped while it dries.
Grain, color, and texture
While waiting for the glue to dry, I came to a few conclusions:
At the beginning of the project, a little time must be made for choosing wood veneers. There are no strict rules. The pieces may be complementary or contrasting. Most everything is a shade of brown, so this can make the task a bit of a challenge. Color theory lends some guidance when mixing color shades.
A majority of the woods are unlabelled and, in turn, unidentified. Why? Most veneer packs are accumulated through purchases from various sources. Depending on experience, species like maple, walnut, zebra and other woods will be recognized. Much of the time it doesn’t matter. Some uncertainty, however, can be avoided by purchasing labelled veneer from a reliable vendor. Shop made veneer from known resawn wood is another option.
All veneer is not the same width or length. Variations occur due to availability and rarity. This is important to note when the marquetry design highlights texture via grain orientation.
Thickness of the veneers is not uniform, either. They range from 1/32″ to 1/16″ or more. There are no limitations, however. The smaller pieces can stand out as design features. Lighter shades of wood species can be dyed or sand shaded.
So, who knows how the veneers will finish alongside each other? It comes down to experience, picking what you like, and having fun with it.
Know thyself
I admit that In this very hands-off world, thumbing through a collection of wood veneer of every shape, size, and color provides a tactile feast for the hands and the eyes.
Often, I feel I cannot let go of a gorgeous piece of veneer. It might be the grain or the color. It might be the rarity. I feel like I just can’t use that particularly bewitching piece for anything. Somehow I need to preserve it for posterity. In other words, I put it on my “never to be used” pedestal. Have you done it for something special in your own life? I do this with the beautiful fabrics and beads that I find. Eventually, I return to my senses, pick up the piece and transform it into something else wondrously made.
Leveling the mask
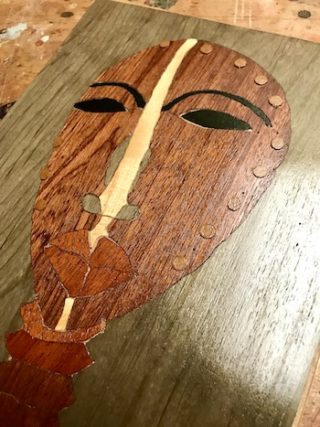
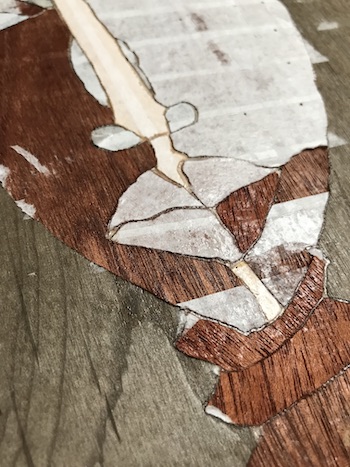
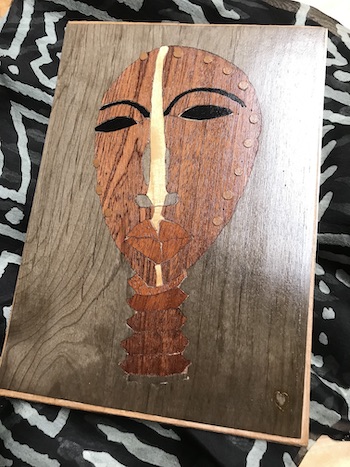
Once the puzzle has dried, the veneer tape must be removed from the show face. Now, it needs to be leveled. This is an important task in preparation for the finish.
and scraping before applying the finish.
The design surface is best leveled or flattened with a sharpened scraper.
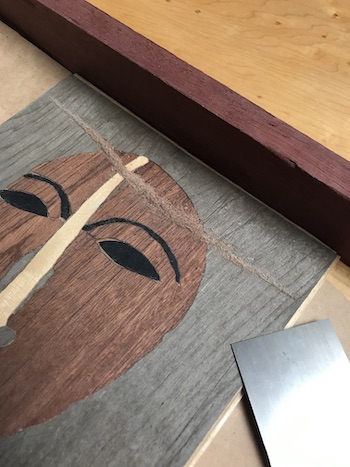
Then sandpaper, 150 through 220 grit, will be enough to even out the surface. Now, it should be uniformly flat, even, and smooth. Inspection may reveal some gaps. These may be filled with wood filler, hot hide glue, or sawdust and glue. Scrape again after that or after any other bit of fine tuning. Then scrape and sand delicately. Care is required in this phase so that drilling (sanding down to the substrate) does not occur.
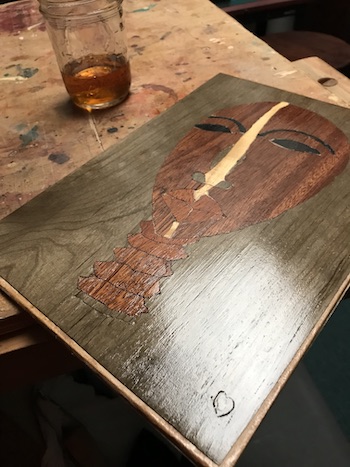
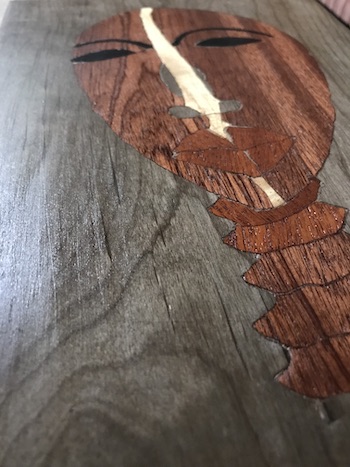
Shellac is back
I prepared my own finish – fresh shellac from flakes in this case. It is my favorite finish for much of my work. Then I used 4 coats on the Dan mask. The finish leans toward a satiny sheen.
Glue tales, two
Finally, I placed the “holes” atop the mask because they were too small and delicate to cut safely. Instead, I punched out the holes from a thin piece of veneer and glued them to the mask. Then I sealed them with shellac. I like the ironic presentation of the holes being above the finished surface rather than below.
This was a great project. It turned out better than I thought. Sand shading, the use of semi-precious materials, application of dye color and other touches all point to exciting opportunities in future projects.
One intended post about a small marquetry project turned into three, but I wanted to take my time. I knew immediately that this could be a long one!
Many paths from the same place
I learned that releasing the constraints of conventional thinking brings on an onslaught of new ideas and new ways of doing things. The old ways of thinking serve as the gateway to a better future not as a barrier to change.
My choice of the unconventional afrocentric theme was satisfying. Learning about the religious and spiritual purposes of the masks was humbling for me. Elements of African creative thought have been used throughout history but rarely acknowledged as an influence.
Gle or ge are terms that the Dan people use to refer to masks and also the spirits that reside in the mask during masquerades. In order for a spirit to embody a mask, someone must first have a dream that reveals the nature of the spirit, and a council of elders will then decide whether the ensemble should be created.*
All too often, influential African themes in the decorative and manual arts were and still are “borrowed” and hailed as a new invention or discovery.
A controversial and, at the time, scandalous example is the work that ironically elevated the acceptance of cubist art in the early twentienth century.
Picasso’s Demoiselles d’Avignon (1907) painted during his Black or African period exhibits a significant presence of the Dan and other tribal masks. At the time that the painting was publicly displayed – years after its creation – the artist refused to acknowledge the African influence in this work.
His friends and contemporaries recognized those telling elements, however, and said out loud what he could not.
Because the mask is your face, the face is a mask, so I’m thinking of the face as a mask because of the way I see faces is coming from an African vision of the mask which is the thing that we carry around with us, it is our presentation, it’s our front, it’s our face.
– Faith Ringgold
Aahhh, that face!
Shirley J 🌹
—–
This is the end of The Mask, part 3 of 3, in the Dan Mask Marquetry series. Here are the others:
Did you like my unconventional marquetry subject? Let me know below.

2 thoughts on “● The Mask”
Well done, all those pieces put together, look at it now, very good keep up the good work.
Thank you for following the journey!
Comments are closed.