The building begins for my Spanish style chest. In part 1, the prologue, I discussed, then resolved some questions regarding this specific project. In this short series, I recall my journey and invite you to join me.
BE MINDFUL: If you are going to make this project, safety is first and common sense is not far behind. Everyone making anything should modify choice of wood, measurements, tools and techniques, fittings, and finish according to their own skills, preferences, needs, space, and circumstances.
Memories
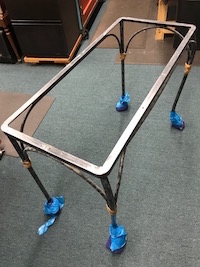
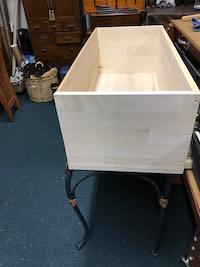
I looked around for some ideas for the base of the chest. A wood base is a standard choice for a project like this. Oh, I remembered the remnant iron base of an old wicker desk that belonged to my mother. This was the perfect solution. While I work on the project, I will feel her protective lioness spirit.
Finally getting started
First I looked through my wood stash to see if I had enough wood on hand to complete the project. I didn’t.
I accepted this as an opportunity to use glued up pine panels versus solid wood boards. Then, I could paint the chest. It was a simple and easy choice.
Did you notice that I love color?
I envisioned a buttermilk yellow milk paint finish. Black hardware accents would further establish the piece as a Spanish style chest. Need I say more?
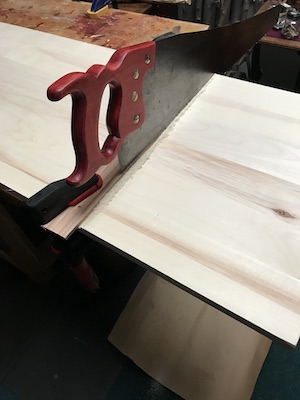
I purchased 3/4″ thick glued up panels. Why glued up panels? They are flat, sanded and dimensioned. And affordable. It’s just a matter of picking the panels. It’s easy and saves a lot of effort. No work is required to laminate or edge glue narrower boards.
After the saw, the main chest build
Yes, glued up pine panels were the perfect choice for this project. All I had to do was make sure that the ones I picked were well-glued. Based on the plan in my head, I selected two: each 12″ (actually 11-1/8″) wide x 6′ long x 3/4″. From these I cut the front and the 2 box sides.
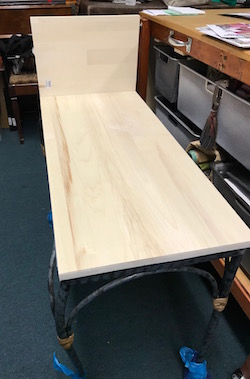
Since the bottom was only going to be about 38″ long to conform to the dimensions of the iron base frame, a 16″ wide x 4′ panel was used.
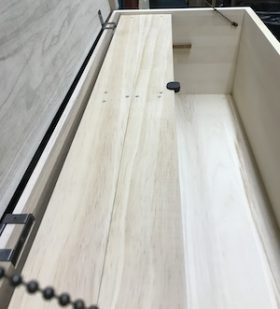
The back was cut from a 36″ x 12″ x 3/8″ maple panel that I had in the shop. The upper backer strip for the back was a piece of 36″ x 2″ x 1/2″ walnut left over from another project. This will create the support for attaching the hinges to the chest.
The pieces after cutting and trimming:
- Front – 12″ h x 35″ w x 3/4″,
- Sides (two) – 12″ h x 16″ w x 3/4″,
- Bottom – 16″h x 36-3/8″ w x 3/4″,
- Back – 12″h x 35″ w x 3/8″ plus backer strip – 2″h x 35″ w x 1/2″ – sandwiched together for attaching 3/4″ offset hinges.
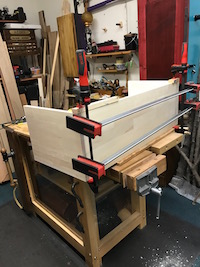
Building the Spanish style chest was completed quickly using butt joints and screws. Checking the panels for square after cutting everything to size saves some headache as the construction continues. The only other pressing concern was making sure that the box or carcass, was square at all of the joints. As always, those trusty clamps came in handy for the glue up!
But we didn’t come to play
Butt joints are the go-to utility joint for many woodworkers. Nothing is “an indeterminate subject of reality” in a small shop. Whatever exists for its own purpose, matters – even this lowly joint.
All holes are countersunk after drilling to hide the screw heads just below the surface of the wood. These can be filled with shop made or ready mixed putty or left unfilled. For the Spanish style chest, I left all of the holes unfilled except for the lid handle. Pine wood plugs were inserted in those holes, as you will see in the next post.
As a matter of aesthetics, visibility of the butt joint screw holes, end grain and edge grain should be considered with care. They are not dovetails, certainly, but are holding the entire project together. That feat alone is not insignificant! Nonetheless, balanced placement of these treatments throughout the project still counts.
Random but not so random
Details in design, structure, and purpose are the elements that make the vision come alive. What you desire to be prominent on the project should be given more than a little consideration. This becomes important as thought manifests into reality.
Ultimately, you will confront, to your chagrin or delight, choices made hours or even days ago. As much as we would like it to be, not much in the shop is really random.
Building the Spanish style chest continues…
Now that the major assembly has been completed, it’s time to construct the solid wood lid top for this chest. Which wood should I select to enliven the design?
This is the end of part 2 of a 4 part series.
Next time: Spanish Style Chest – part 3.
💚S
