
Vinyl album storage is problematic for music lovers. The old style solution regarding storage was a wood crate or cardboard box. Nowadays, with the focus on minimalist lifestyles and downsizing living spaces, there is no room for albums. The question of what to do with the records continues to be an issue.
I’m talking about pressed LPs, the original data storage disks. Trying to store a lifetime’s worth of albums leads to a bulky mess. This dis-arrangement is tolerated for the music and memories that it contains. Untold misery and indecisiveness about this issue has vexed album lovers for more than 70 years.
The digital era has been beneficial to fans of music because thousands of music files can be stored in a single, portable storage factor. Personally, I have an older portable mp3 player which now holds over 15,000 music and related items.
I love it, but in the not too distant future these players will no longer be supported by their makers. They are just the latest casualty of the rapidly changing, increasingly user un-friendly, digital world in which we live. Ironically, part of this is driven by storage issues!
I still love those old school records
I am a big fan of the old style vinyl records and debate whether the storage of these things should be open or closed. How do you store over 250 albums with that fabulous album cover art and liner notes?
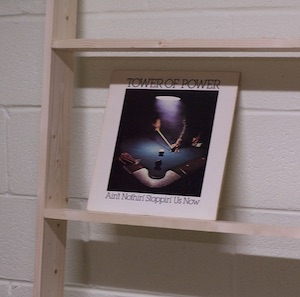
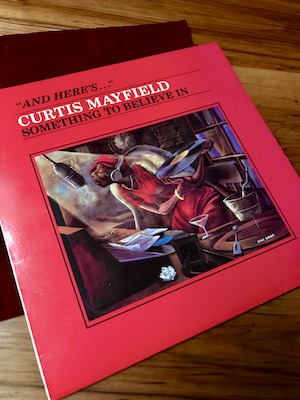
Right now, the distinctive ringing guitar riff that opens Curtis Mayfield’s song “Never Stop Loving Me” is inside my head. The album, Something to Believe In, features Ernie Barnes’ fabulous cover art. The cover, featuring that sassy black woman DJ spinning records in a red dress, should never be put away.
Let it live. But how?
A Little Bit About the Record Player
I have an old school belt drive turntable that has travelled a few places with me.
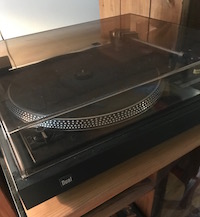
I would hate to get rid of it. The turntable has provided great sound quality over the years. Importantly, it has proved to be very reliable in the minimal simplicity of its mechanics and construction.
I’ve only had to find a replacement stylus or needle for the unit. Replacement needles for a Dual 505-2 belt drive turntable were hard to find even in the nineties.
Already, the writing was on the wall for the player, records and the storage space! Still, whenever I moved, the player and music went with me.
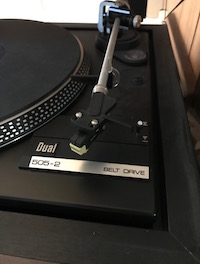
I did find a needle, eventually, at an old record shop that, sadly, no longer exists.
That old, faithful turntable has delivered mellow sounds for over 30 years and never spent one day in a repair shop.
Happily, of late, there has been a renewed interest in LPs and turntables.
Making a Minimal Album Storage Rack
This is a simple project. It’s only purpose is to serve as a storage solution for the albums.
BE MINDFUL: If you are going to make a rack, safety is first and common sense is not far behind.
Everyone making anything should modify choice of wood, measurements, tools and techniques, fittings, and finish according to their own skills, preferences, needs, space, and circumstances.
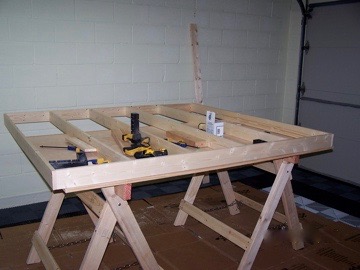
This is how I made my vinyl album storage rack.
To start, I measured the space on an available wall and decided I did not want the length of the rack to exceed six feet. The rack height of six feet on a eight foot wall avoids the HVAC registers and keeps it aesthetically positioned.
And I wouldn’t have to do a lot of cutting and fitting since I bought the wood already dimensioned at the lumber yard.
Dimensioned pine boards, six feet (6′) long, were purchased for this project as follows:
• Top, bottom and sides: 4 boards – 1″ x 4″ x 6′
• Top cleat: 1 board – 1″ x 4″ x 6′
• Shelves: 6 boards – 1″ x 4″ x 6′
• Shelf lip edge: 6 boards – 1/2″ x 2″ x 6′
See where I’m going with this?
TIP: Make sure your measurements conform to what you’re getting. For dimensioned lumber, an inch isn’t an inch anymore. A 4″ nominal measurement in width, for instance, will only get you an actual measurement of 3-1/2″. Make the necessary adjustments in your plans or in the size boards that you ultimately get.
Electric tools are allowed
The rack is put together with pocket hole joints. The pocket holes can be made free-hand or with a jig. So, on this project using dimensioned lumber, I broke out my pocket hole jig and electric hand drill.
Yes, pocket holes do live in a hand tool wood shop. A mind is a terrible thing to waste if you don’t use it to conserve your resources and energy. No hating on that!
Hardware:
- pocket hole screws
- L- brackets, steel
- washer head screws, 2-1/2″ long
- vinyl coated wire, 1/8″ diameter
- crimp fittings or clamps for the wire
- steel eye hooks
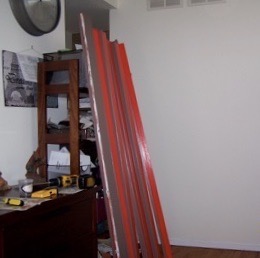
For small spaces and narrow stairs: drill the pocket holes and assemble the piece in your workspace. You can paint the rack if you want. Then disassemble the rack, transport the parts to the installation wall, and reassemble. The pocket hole joints will snap to and make quick work of the installation.
Do I need to say this? Make sure that the albums actually fit on the shelf. Plan for enough room in the spacing between shelves to grab the albums without bumping your knuckles.
Just Enough Detail
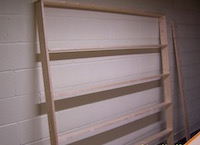
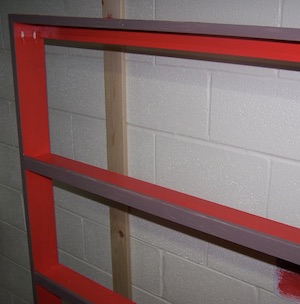
To keep the albums from sliding off the shelves the 2″ wood strips are installed at the front edge of each shelf length.
Also to keep them from falling forward vinyl coated restraining wire with a bit of slack is strung across each row of albums.
The narrow profile of the rack saves space and deceptively holds over 250 old school vinyl albums in their jackets.

The 4″-ish depth of the shelves is adequate for me.
Next, assess how much flex is in the assembled rack. A very long rack will be “springy”. Be prepared to address this when you post the rack to the wall.

This rack is finished with satin paint for durability and interest:
• color: coral satin for the top, sides, and shelves
• color: truffle satin for the lip edge applied to each shelf and the front facing edges of the top, and sides
After locating all the wall studs, I marked them off with a bit of blue tape. Keep in mind that the space several inches below the air vents or registers may not present a clear stud. You may encounter an air duct, instead. Do not drill into that! Just move along to locate the next stud.
It is also important to ensure that access to the electrical outlets is preserved. A light switch or outlet can be incorporated in the rack spaces. Just don’t place an album stack in that space.
After reassembly, the shelving is ready to be lifted and posted onto the wall. Washer head screws are driven into the studs through the coral cleat spanning the top of the rack. This will anchor and support the rack frame.
An electric hand drill with a screwdriver bit makes this part go quickly. The stud markings are used to post 2″ L-brackets for hidden support along the bottom shelf. If the rack is longer, then you may need to bolster them by strategically posting “L” brackets under the upper shelves.
Another idea is to add lengthwise cleats to all of the shelves if the rack will tend to bend. Now, the rack is posted flush to the wall and off the floor.
The restraining wire
The wire restraining line must not be too rigid. Each wire is threaded through the eye hooks about 3″ down from the top of the shelf on each side of the rack. Run the slacked wire until the center is about 6″ down from the top of each shelf. The wire ends are secured by looping them through the crimp fittings.

Now, the albums in front can lean forward on the wire without interfering with album selection and don’t have to be removed. This is truly helpful when thumbing through the stack.
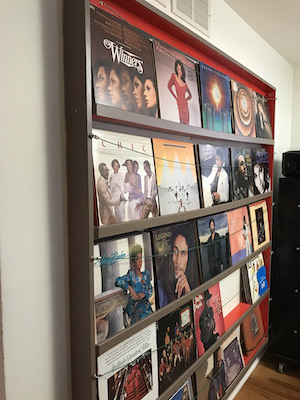
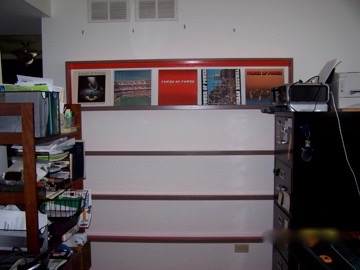
The narrow profile of the rack makes an unobtrusive presence. Each stack holds about ten records comfortably. The aesthetic is that the back-leaning stack gives the impression of a single album.
Stacked Albums: Vinyl on Vinyl
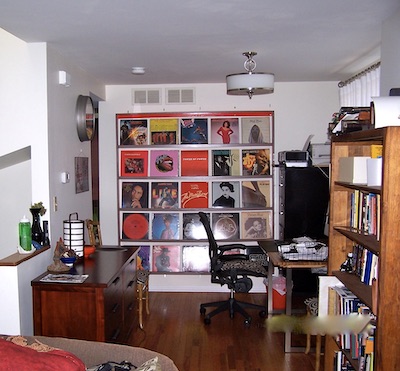
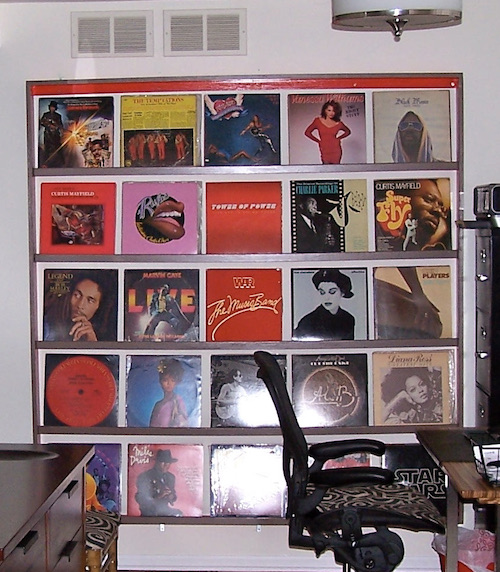
Those “old school records” really draw the eyes into the room. In addition to providing lovely color and interest, the albums can be accessed and rearranged any time.
This simple storage rack is an artful conversation piece that never fails to evoke sweet memories from the past, even in the digital age.
-Shirley J
🎼
• Happy B-day, ERK! •

4 thoughts on “● Old Style: Vinyl Album Storage”
I love it, keep up the good work and keep it coming.
Glad you’re loving the work! Thanks.
I love your album rack. I have about 150 albums that is a very good ideal
There you go! Thanks.
Comments are closed.