Self-care in the wood shop is not part of conventional woodworking thought. A shop is considered a place of dogged pursuit and hard work. It is a place to slay the 16 foot beast and live to tell it. But self-care? To admit a need for that takes “courage”. My well-being is as important inside the shop as it is outside. Given the time that I spend here, which can be a lot, self-care makes sense.
Stand up and sit down here
I get a great workout when sawing, planing, and moving wood around the shop. There’s even a little “zen of woodworking” vibe going on.
Since I am a hand-tool woodworker, I appreciate the effect that the art has on my body. I work up a good sweat. My abdominals get a workout. I also work on improving my posture and arm and wrist alignment.
I am on my feet so much of the time when I’m working on a project. It’s not hard to end the day realizing that I hadn’t sat down at all. Whenever I do sit, it’s to review my plans, pay bills, and leaf through my woodworking books and magazines. Of course, I rest my feet.
Still, for a long time now, an adjustable standing desk had been on my wish list.
Urgency of self-care in the wood shop
Studies show that sitting too much is bad for your health. Whether you are drawing up plans for your next project or working at the computer, you need to take breaks from sitting.
An adjustable standing desk is the perfect solution for sitting too long. When adjusted to sitting height, I can do the majority of my tasks. When I need to take a break from sitting, I could adjust the desk to standing height and continue my work. I can shake my legs and do simple exercises.
There are many iterations of this desk in a range of price points. Most quality standing desks are pricey. Adding a top, base color, and other options can result in a price tag that may be difficult to justify for a small shop. But they are nice to have.
One day I was at the local office supply warehouse when I saw a display with an adjustable standing table. Kismet! I had never seen one in the wild before, so I walked over to see this thing up close.
Beautiful? Yes. Functional? Yes. Affordable? Well…yes, if I buy the base, only.
Hmm…
I could make the desktop and assemble the whole lot.
I am a woodworker, right?
This is my journey.
Selecting the wood for the desktop
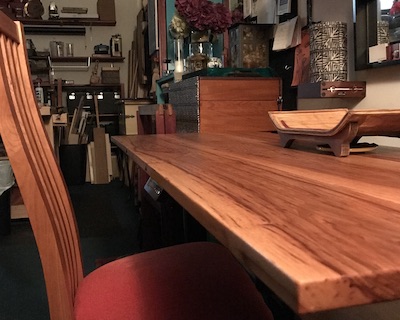
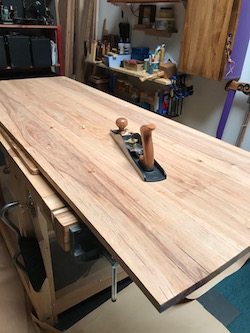
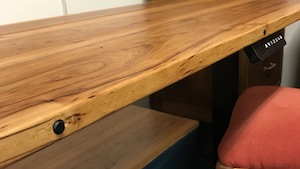
Pecan is one of my wish list woods. Part of the hickory family, it is heavy, coarse, and a little temperamental. It’s hard on hand tools and the tearout can be exasperating.
When finished, however, it has a beautiful, rustic feel and warm glow.
It doesn’t appear often at the lumber yard near me. There’s not a big demand for it and it is not cheap!
When I spied the pecan at the lumber yard, I did not hesitate to get it.
One of the things I had to think about was how much of the wood to get. The boards were 3/4″ thick. I would have loved a desktop that was twice that or 1-1/2″ thick. In order to have that I could face glue two boards for a heavier, more rustic look. They were already pricey, so I decided to go with just three 8-1/4″ to 8-1/2″ x 60″ x 3/4″ boards.
There is one more issue for consideration regarding the panels. The motor has a specified load limit which includes the desktop material and anything that is placed on the desk.
Extra board weight or thickness means more strain on the motor when it’s lifting and lowering the top. This is especially important for a heavy, dense wood like pecan (47 lbs/cubic ft). That means that the wood top, alone, at 60″ long will weigh close to 30 pounds.
In my mind, a 24″ wide desktop is wide enough for working on drawings. It will also serve as an occasional stage for other workshop projects.
Putting the standing desk together
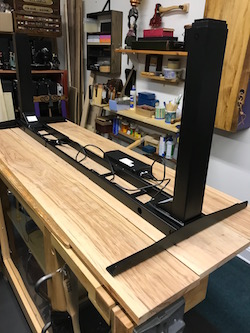
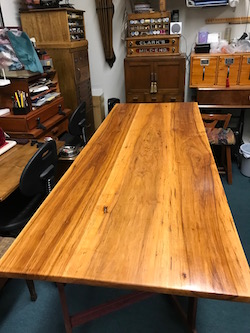
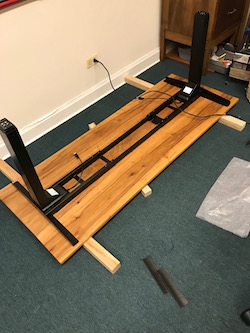
The black metal base, aka the legs, was simple enough. I laid out the pieces on my work bench and arranged them (upside down on the pecan panels) as they would fit together as a finished desk.
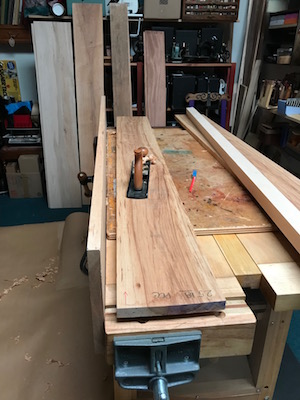
Workholding on the roubo bench with the leg vise and holdfast on the bench leg makes edge joining go quickly.
Then, I edge-glued and clamped the three boards before I finish planed them.
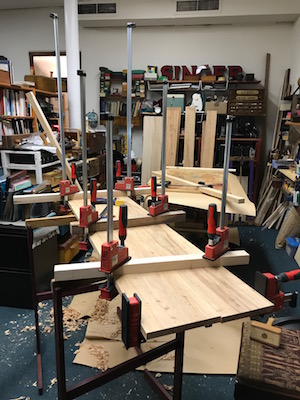
Here, the bench hook digs its teeth in the board and allows me to use both hands for finish planing.
It didn’t take long. The boards were pretty flat when I picked them out at the lumber yard.
Taking the time to pick out flat boards saves a lot of work, too.
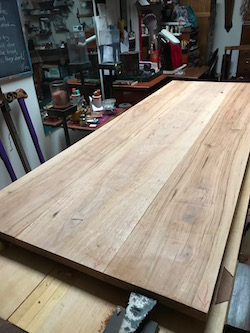
The wood had a few areas that produced a bit of tear out when I put the jack plane on it.
But a few passes with the blade set for finer shavings in a no. 4 plane took care of most of it. I used some fine sandpaper to complete that job.
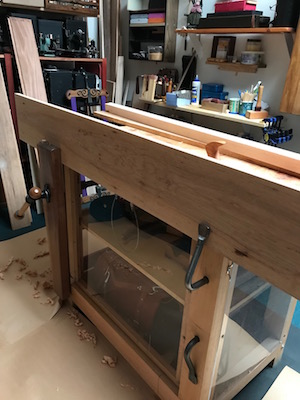
I made up a blend of pure tung oil and varnish that tamed the wildness of the wood.

It took three coats, drying completely between each one. The result was well worth the work.
I applied the initial finish on the desktop before application of the base and hardware. It was easier to turn over and manipulate. Importantly, this ensures that no part of the top and underside are left unfinished. If a touch up finish is necessary after the base has been attached, that can be done. At least one “whole coat” protects all of the raw wood.
Tear out can occur at any time
Pecan is, I say again, rustic wood that finishes beautifully. On a last minute whim, I added a couple of ebony plugs at the front edge of the desk. Immediately, I knew that this was not going to end well. I got a small bit of tear-out when I drilled the holes. The cause?
- the tendency of pecan to tear out,
- by use of a (possibly) dull drill bit,
- my dismissing the importance of a 1/8″ inch pilot hole for a 3/8″ inch plug hole in an edge grain.
To remedy this as much as I could, I used a small gouge chisel to taper the holes until most of the tear out disappeared. After that, I sanded the tapered holes and inserted the plugs. Whew! That’s thinking on my feet while making a standing desk! Next time, I’ll proceed with caution when drilling holes in narrow edge grain that’s susceptible to tear out!
Now I can add another piece of wood -pecan- for my sample box – with notes!
One Nice Thing
Click on the video below to see the desk in action:
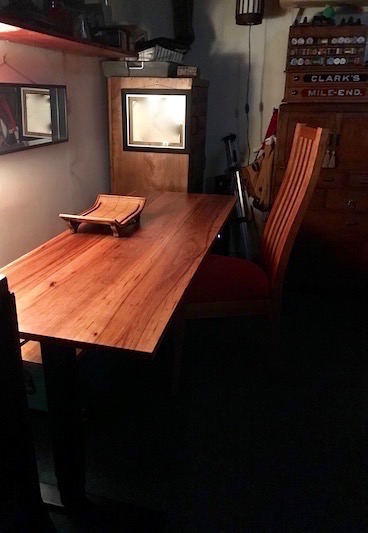
This was a fun project. It is an attractive desk and affordable. Standing or sitting, it supplies another layer of wellness to my shop life.
So treasure your moments of happiness, the glimpses you see of the truth, the nights you’ve been loved. That’s all you’ve got. – Fay Weldon
And, I have my sitting and standing desk.
If this isn’t nice, I don’t know what is. – Kurt Vonnegut, Jr.
Yes, even in the wood shop, I can have nice things!
-Shirley J
💛

4 thoughts on “◾️ Self-Care in the Wood Shop”
Well planned and constructed!
Thanks!
Nice, well done
Thanks!
Comments are closed.