A primary goal in my wood shop is keeping it green. I do not have a problem using old hardware, reclaimed wood, unconventional, or less sophisticated touches in a new project. One of the ideas for creating or refurbishing anything is to end up with something that looks better than the lumber I started with. It’s all uphill from there.
Many times, I’ve had to take a long, difficult way round to end up with a project that is esthetically pleasing. That’s me all right – winning ugly.
But it could apply to any endeavor in life.
Taking it from the streets
Out of habit, necessity or frugality, I don’t throw much away. Not everyone agrees and that’s acceptable. I spot wood on the street – branches or even old furniture. Sometimes, I pick it up and take it back to my shop.
Old furniture is a great source of wood. Well-made old furniture yields quality wood stock with a pedigree. It’s practical and a work-about for keeping it green when being green may not be the original intention.
Awareness must still be made of chemicals, finishes, and other substances that were used then but are banned now. A mask or other filtering equipment is critical when working on old wood. Sawing and sanding these old pieces can stir up dangerous particulates that you do not want to be inhaling!
Influence of the Greene Brothers
Architect brothers Charles Greene and Henry Greene used finger joints and screws in their iconic early twentieth century furniture and houses. To this day, their Craftsman aesthetic still inspires research and continues to be copied by woodworkers. This style, included in historical furniture and architectural design archives, is aspirational.
Some of the best examples of the Arts and Crafts period are embodied in the Greene brothers’ designed homes and original contents. Many are located in southern California. The Blacker House, Gamble House, and William T. Bolton House, among others, are preserved, renovated, bought and sold.
Distilling the extolled status of this style to a simple finger joint may be blasphemous. In its simplicity, the joint is rustic in appearance; some people think it is ugly.
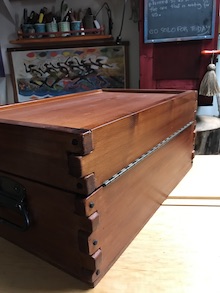
Of course, I decided to make a finger-jointed tool box.
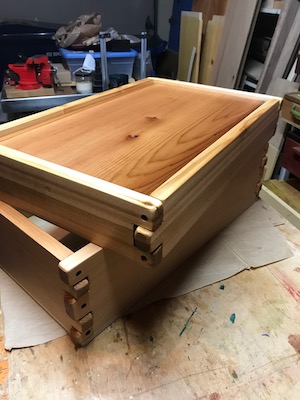
Douglas fir
My inspiration was a special tool box made by a Canadian carpenter, whose work is influenced by Japanese woodworking techniques. Made from Douglas fir, the box featured a beautifully carved recessed lid, vintage Eastlake latches, and finger jointed panels. I have a handful of those latches myself and was looking for a project to use them.
The idea of using Douglas fir was intriguing, so I trekked to the local lumber yard. Since I had not worked with the wood before, this was my first choice.
My favorite lumber yard does not stock the wood on a consistent basis. I was lucky this time and found some.
It is fast growing and slightly harder than pine. Historically, Douglas fir had been used for railroad ties, telephone poles, and the tough hull of a special class mine-sweeping ship in the navy.
Finger joints
Finger joints are to dovetail joints what the fat crayon is to the classic grade school crayon.
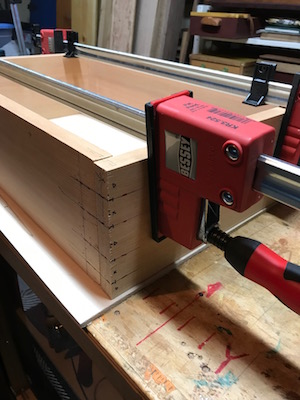
They are easy to cut but the layout of the interlocking fingers need to be thought out with care.
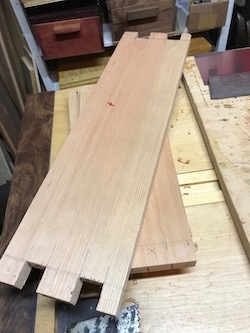
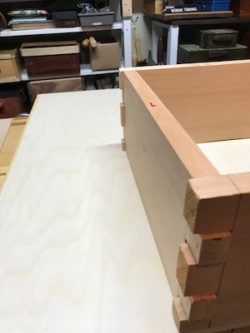
It was fun thinking this through. It felt like a build up to making dovetails. After cutting the wood according to the layout, the “fingers” were shaped with rasps and sandpaper, then dry-fitted.
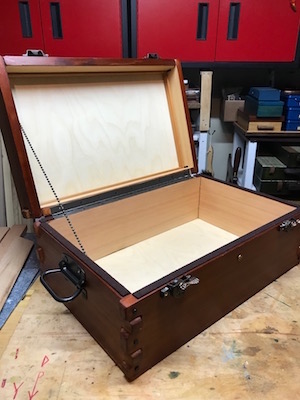
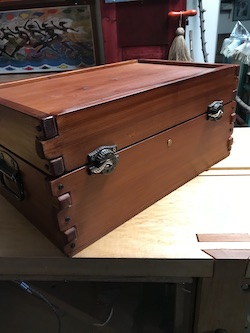
I wasn’t looking to carve a top for this project like the inspiration box. However, a small 3/8″ thick panel of Alaska white cedar that I picked up at the lumber yard could be useful. This would be the recessed lid panel (sealed with shop made shellac).
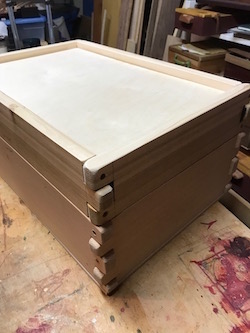
The front, sides, and back of the box were finally interlocked. Then, I used glue and screws to secure the panels.

Screws were used in the construction of the furniture. That was a Greene Brothers hidden construction detail.
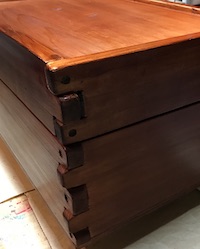
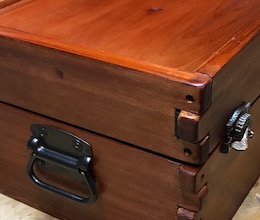
Another Greene and Greene aesthetic was the use of ebony plugs to cover the screw fastener holes. This along with the clever use of ebony or walnut splines raised the quality of the work.
I wondered if those details were more than decorative. Now I know.
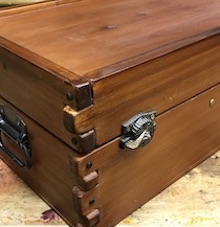
Keeping it green – old hardware
Original Eastlake hardware is quite old. I search for original latches and door hinges at antique shops, flea markets and on-line. Eastlake was a prolific, popular design style in the late 19th century known for its geometric patterns with a touch of Japanese naturalistic design.
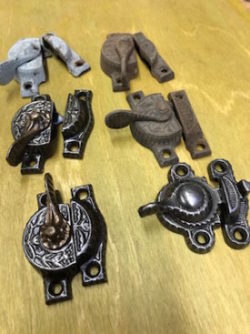
These original hardware pieces are sought after for restoring Victorian homes. Of course, hardware in good shape costs a pretty penny. If they are in less than good shape and I see promise, I buy them. This goes for any interesting hardware that I might see at flea markets, antique shops, and estate sales.
I have been lucky with my findings: single, unmatched pieces and mates discovered later on. Similarly, pieces that have been painted over are put on my clean up list to be stripped and finished. I don’t shy away from rusted latches, either. A light clean or a soak in my citric acid solution does the trick. I’ve made many bargain finds this way. And I’ve kept it green!
Assembly was completed with the addition of a piano hinge, steel folding pull handles, and those restored Eastlake latches.
Keeping it green – the finish
The traditional Greene and Greene dichromate finish, familiar to most people, is not widely available today. It was a distinguishable feature of this classic furniture style.
The red-orange crystallite, potassium dichromate, is a highly toxic carcinogen. It was used casually in early furniture finishes before the danger it posed was fully known.
Experimenting with less toxic water-based stains, I stopped at a one part brown to two part orange mixture plus a few drops of yellow. It closely resembles the classic finish. My next project might get a slightly altered mix due to the fact that I did not take very good notes.
I started with a couple colors, brown and orange, then added a few drops of black, then red, then white. Well, you know how that went. It got a bit murky. I started over. And I ended up with the original two colors. The yellow was added to brighten the mix but I know it didn’t make much difference.
This exercise was not documented and I couldn’t recall it if I tried. My goal, in all of that mixing and stirring, was to get a close enough shade this time, and this time and this time …
I am certain that you, dear reader, will relate to that.

Didn’t I mention something about winning ugly? Rustic beauty, indeed!
-Shirley J
💚

2 thoughts on “● Keeping it Green”
Very good, I love it
Thank you so much for reading!
Comments are closed.